The post Create Virtual Hosts in Apache wamp xamp appeared first on Coding Sips.
]]>and can can only put our projects inside default folder www for WAMP and htdocs for XAMP.
when we access our projects our urls are something like the following
localhost/project1
localhost/project2
localhost/project3
the main domain in all above URLs is localhost. all the 3 projects are parts of that single domain.
What is Virtual Host
Virtual hosting is a method using which we can share resources of one single server to host multiple projects or website with separate domain names.
if we want to have separate domain name for each or some of our projects let say for above 3 projects we want domain names as
project1.com
project2.com
project3.com
now all these domain names are different from each other and they hold separate domain names.
It is easy to setup, just note few points.
How to setup Virtual Hosts in Apache
I will be demonstrating the steps assuming you have installed WAMP server, for XAMP and MAMP there will be little paths differences.
to setup one or more Virtual Hosts we have to edit only 2 files
- c:\wamp\bin\apache\apache2.2.23\conf\extra\httpd-vhosts.conf
- c:\Windows\System32\drivers\etc\hosts
Step 1- Editing httpd-vhosts.conf
Goto c:\wamp\bin\apache\apache2.2.23\conf\extra\
Open httpd-vhosts.conf in notepad or other editor and paste the following code
#FOR PROJECT-1

ServerName project1.com
DocumentRoot "${INSTALL_DIR}/project1"

Options +Indexes +Includes +FollowSymLinks +MultiViews
AllowOverride All
Require local


#FOR PROJECT-2

ServerName project2.com
DocumentRoot "${INSTALL_DIR}/project2"

Options +Indexes +Includes +FollowSymLinks +MultiViews
AllowOverride All
Require local


#FOR PROJECT-3

ServerName project3.com
DocumentRoot "d:/xamp/htdocs/project3"

Options +Indexes +Includes +FollowSymLinks +MultiViews
AllowOverride All
Require local
Using these Virtual Hosts we can also put our project source code in different folder (other than default wwww)
After saving changes, restart WAMP server.
Step 2- Editing hosts file
Goto C:\Windows\System32\drivers\etc\
open notepad as an administrative, and open hosts file
At the end write the following 3 lines one for each project Domain Name
127.0.0.1 project1.com
127.0.0.1 project2.com
127.0.0.1 project3.com
Now you will be able to access each project as a separate Domain Name
Listen 0.0.0.0:80
Listen [::0]:80

Listen 0.0.0.0:81
Listen [::0]:81

Listen 0.0.0.0:82
Listen [::0]:82
Isn’t it easy, let me know if you still have problem
The post Create Virtual Hosts in Apache wamp xamp appeared first on Coding Sips.
]]>The post How to Get and Set PHP Custom Environment Variables appeared first on Coding Sips.
]]>Scope wise these are Super Global Variables, although we can limit our custom vars to our application only we have discussed it step 4 below.
Lets have a look at PHP Default Environment Variables, we can view all Environment Variables executing the following code.
echo '';
print_r($_SERVER);
echo '
';
it will give us the following array of different variables
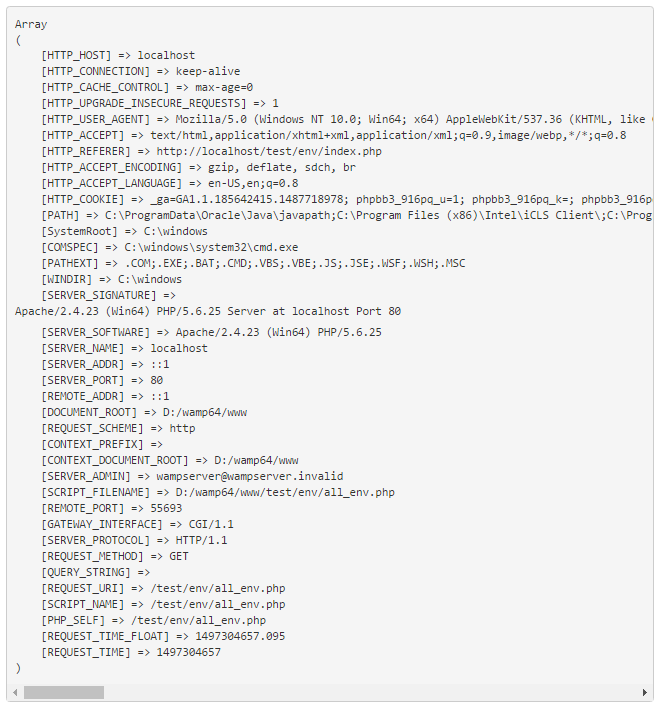
we can access single variable by using $_SERVER array or getenv() function as below
echo $_SERVER['HTTP_HOST'] . '
';

echo $_SERVER['REMOTE_ADDR'] . '
';

echo $_SERVER['SCRIPT_FILENAME'] . '
';

//or we can also get above 3 variables by

echo getenv('HTTP_HOST') . '
';

echo getenv('REMOTE_ADDR') . '
';

echo getenv('SCRIPT_FILENAME') . '
';
Setting Custom PHP Environment Variables
Yes we can store our custom variables too, and that can be accessed and used in the same manner as default Environment Variables.
Why We Need to User Custom Environment Variables
In short we need to use Custom Environment Variables to make our application more secure.
While developing dynamic websites we connect to database, email systems and other external components or services through their credentials like Host, User, Password, Port etc.
It is bad practice to write these credentials inside our PHP coding because if somehow someone got access to our code he/she can gain access to our database, email or other connected service and can make unwanted changes or steel our sensitive information.
To avoid it we have an option to keep these credentials as variables outside PHP code in some secure directory of our server, Environment variables gives us this facility.
How to Set Custom Environment Variables
There are several ways to set Custom Environment Variables few of them are given below.
- Using putenv() function
- using .htaccess file
- using Apache config files (httpd.conf)
- using virtual hosts (httpd-vhosts.conf)
1- Set Environment Variables Using putenv() function
This method sets Environment Variable temporarily, once script is ended, Variable(s) set by this method will no longer exist. it can be set and accessed as the following code snippet.
//Set Environment Variable

//with name=var1 and value=secure_value

putenv("var1=secure_value");
//to access it
getenv("var1");
2- Set Environment Variables Using .htaccess file
If you project has .htaccess file write the following code at end of that file, else create a file named .htaccess and write the following code.
SetEnv host localhost

SetEnv user root

SetEnv password test

SetEnv database my_project
Above 4 variables will be set instantly and we can use it in our PHP file for database connection as below
$db= new mysqli($_SERVER['host'],$_SERVER['user'],$_SERVER['password'],$_SERVER['database']);

if($db->connect_error)

{

	echo "ERROR: (".$db->connect_errno.") ".$db->connect_error;

	exit();

}
see above implementation the values of all variables are outside PHP coding, it is bit secure than writing these credentials in PHP as below
    $db_host = "localhost";

    $db_user = "root";

    $dp_pwd  = "test";

    $db_name = "my_project";

    $db= new mysqli($db_host,$db_user,$db_pwd,$db_name);

	if($db->connect_error)

	{

		echo "ERROR: (".$db->connect_errno.") ".$db->connect_error;

		exit();

	}
3- Set Environment Variables Using Apache config files (httpd.conf)
To make it more secure we can write it in Apache config files like goto C:\wamp\bin\apache\apache2.2.23\conf and open httpd.conf file in notepad or some other editor and write the following code at end
SetEnv host localhost

SetEnv user root

SetEnv password test

SetEnv database my_project
As we have placed our code at Apache level, so we will have to restart Apache before accessing these variables because it will not be set before restart of Apache.
we can access these variables same as we did in above example
$db= new mysqli($_SERVER['host'],$_SERVER['user'],$_SERVER['password'],$_SERVER['database']);

if($db->connect_error)

{

	echo "ERROR: (".$db->connect_errno.") ".$db->connect_error;

	exit();

}
4- Set Environment Variables using virtual hosts (httpd-vhosts.conf)
I have also written a detailed blog on Virtual Hosts
If you have setup custom virtual host for your website you can write environment variables in that file too
which will also need to restart Apache and these variables will only be accessed in that project.
virtual hosts files can be seen at the following path
C:\wamp\bin\apache\apache2.2.23\conf\extra
open file named httpd-vhosts.conf if you have setup custom virtual hosts it will have few entries like the following
	ServerName my_project.com

	DocumentRoot c:/wamp/www/my_project
you can write Custom Environment Variable before ending VirtualHost tag as below
	ServerName my_project.com

	DocumentRoot c:/wamp/www/my_project
SetEnv host localhost
SetEnv user root
SetEnv password test
SetEnv database my_project
It will be accessible after restarting Apache, using same method as given below
$db= new mysqli($_SERVER['host'],$_SERVER['user'],$_SERVER['password'],$_SERVER['database']);

if($db->connect_error)

{

	echo "ERROR: (".$db->connect_errno.") ".$db->connect_error;

	exit();

}
It depends on you server and project architecture, choose your suitable method.
Method no 3 which Set Environment Variables Using Apache config files (httpd.conf) is recommended and mostly used.
hope this helped you out, let me know if you have any issue or want to share something that I have missed in this topic.
The post How to Get and Set PHP Custom Environment Variables appeared first on Coding Sips.
]]>The post WAMP Server Always Orange appeared first on Coding Sips.
]]>Now you have 2 options to run both skype and WAMP server at same time.
- Prevent skype to use port 80
- Use some different port for WAMP Server
1- Prevent Skype to use port 80

Follow these steps
- Open Skype
- Goto Tools menu
- Click Options Menu
- Select Advanced tab
- Click Connection
- In Connection setting uncheck
Use port 80 and 443 for additional incoming connections
that’s it. Now you can run your WAMP Server without any errors.
2- Use some different port for WAMP Server

Goto the following path
C:\wamp\bin\apache\apache2.4.9\conf
Yours path may be a little different based on which version you are using.
Open httpd.conf file in some editor like notepad++
Search word Listen
change 80 to 81 or 82 0r 83 or 8080 as showing in above snap
save the file
restart all services in WAMP Server
now it will run successfully but you will have to access it your provided port
Like if you have select port 81 then your localhost will open with localhost:81
Hope this will work for you. if this method didn’t solve your problem than you might have some other issue, google your warning and get your Server running. fell free to post your questions, I will try my best to answer you and help you out running your Server.
Always help your friends in such issues this will give you good experience and knowledge of troubleshooting, because you will encounter different type of issues and make solution for it.
The post WAMP Server Always Orange appeared first on Coding Sips.
]]>