The post Step by step JQuery Ajax file upload with progress bar appeared first on Coding Sips.
]]>now a days as websites are made advanced most of the things are being performed by ajax, file upload can also be performed via ajax as background process, not only that we can get continuous status of upload and show user how much file is uploaded by displaying a decent progress bar.
Before starting have a look at demo at this link JQuery-Ajax-file-upload-progressbar. we will be creating something like this.
Step for JQuery Ajax file upload with progress bar
We can submit our file and text data via ajax, how to handle things?
- write form submit event using JQuery and prevent default functionality as
$('body').on('submit','#frm',function(e){

e.preventDefault(); - Create FormData object as
var data = new FormData(); - Assign it file as
data.append('file', frm.find( '#txtFile' )[0].files[0]); - We can assign other data too like
data.append('title',frm.find('#txtTitle').val()); - Create httpRequest object as
var ajax = new XMLHttpRequest(); - bind events to above object as below code
        ajax.upload.addEventListener('progress',function(evt){

		       //we will get progress here and update progressbar

		},false);

		ajax.addEventListener('load',function(evt){

		       //this event will be fired when upload completes

		},false);

		ajax.addEventListener('error',function(evt){

                //this event will be fired when some error occurs

		},false);

		ajax.addEventListener('abort',function(evt){

                //this event will be fired when file upload is aborted

		},false);
- assign method and url to ajax object as
ajax.open('POST',url); - call send method of ajax object as
ajax.send(data);
This is all, you just have to handle and code above 4 events as you need it. the following 2 snapshots displays how images out form will be looking during file uploading and the send one displays when file upload is completed.
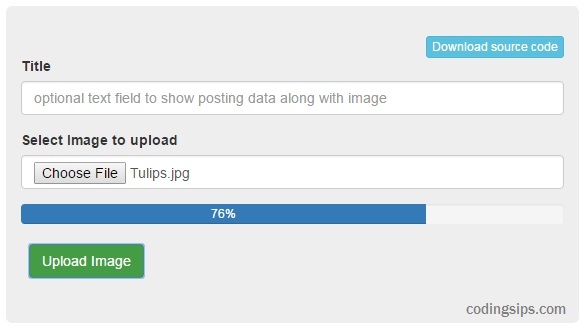

to view running demo click this link jquery-ajax-file-upload-progressbar, if you want to download complete source code of this demo click this link Download source code customize and make changes according to your requirements and needs. let me know if you have any issues I will try my best to help you out.
The post Step by step JQuery Ajax file upload with progress bar appeared first on Coding Sips.
]]>The post How to preview image before uploading with JQuery appeared first on Coding Sips.
]]>Basically we will have to write our code on Change event of file input. which means when ever user changes image the preview will be changes and there will be no page reload, it will happen in no time.
Click the following button to view live demo of how to preview image
Demo of Image Preview
As code is just few lines so I will include whole page code here.
txtFile is id of file input
imgPreview is id of img tag where we have to preview image
Jquery code id written at end of body tag.
An Example to preview Image before uploading
The post How to preview image before uploading with JQuery appeared first on Coding Sips.
]]>The post PHP image upload with Thumbnail appeared first on Coding Sips.
]]>Thumbnails are smaller version of Images to reduce its size to use these smaller version of images where small image can work well instead of using actual image which is bigger in size and dimensions.
this method results into optimized overall page-load.
To start uploading file we have to create a form with attribute enctype=”multipart/form-data” without this attribute image will not be posted.
Here I will be taking a basic form
when the form is submitted we can upload file by 1 line of code
move_uploaded_file($_FILES["image"]["tmp_name"], 'path/to/upload/directory/filename.jpg');
but before uploading we must check the following to handle errors and keep it secure.
- Check if a file is selected, else skip file uploading and output a message
- Check if provided file is valid image i.e (jpg, png etc)
- Check if file is not too big on wamp default max-file-size is 8MB
You can check other things like image with and height or any thing else but these are most common things and must be checked.
here we will be creating an empty array of errors and checking above things if above validations does not meet, we will add an item to errors array. after validations we will be checking errors array if it is empty that means all validations were ok and valid we will upload file, else we will display message from errors array.
//**********file name upload_script.php**********

//errors array

$errors=array();

if(!empty($_FILES["image"]['name']))

{

        //get provided file information

        $fileName    = $_FILES["image"]['name'];

        $fileExtArr  = explode('.',$fileName);//make array of file.name.ext as    array(file,name,ext)

        $fileExt     = strtolower(end($fileExtArr));//get last item of array of user file input

        $fileSize    = $_FILES["image"]['size'];

        $fileTmp     = $_FILES["image"]['tmp_name'];
//which files we accept
$allowed_files('jpg','png','gif');
//validate file size
if($fileSize > (1024*1024*2)){
$errors[] = 'Maximum 2MB files are allowed';
}
//validating file extension
if(!in_array($fileExt,$allowed_files)){
$errors[] = 'only ('.implode(', ',$allowed_files).') files are allowed.';
}
//do other validations here if you need more
//before uploading we will look at errors array if empty
if(empty($errors)){
move_uploaded_file($fileTmp, 'images/'.$fileName);
//here we can create thumbnails by create_thumb() function
//it takes 5 parametes
//1- original image, 2- file extension, 3-thumb full path, 4- max width of thumb, 5-max height of thumb
create_thumb('images/'.$fileName,$fileExt,'images/thumbs/thumb_'.$fileName,200,200);
echo 'File uploaded successfully.';
header('Location:index.php');
}else{
echo 'Some Error Occured:
'.implode('
',$errors);
}
}else{
$errors[] = 'No Image is provided.';
}
//function to create thumbnail
create_thumb($target,$ext,$thumb_path,$w,$h){
list($w_orig,$h_orig)=getimagesize($target);
$scale_ratio=$w_orig/$h_orig;
if(($w/$h)>$scale_ratio)
$w=$h*$scale_ratio;
else
$h=$w/$scale_ratio;
if($w_orig<=$w){ $w=$w_orig; $h=$h_orig; } $img=""; if($ext=="gif") $img=imagecreatefromgif($target); else if($ext=="png") $img=imagecreatefrompng($target); else if($ext=="jpg") $img=imagecreatefromjpeg($target); $tci=imagecreatetruecolor($w,$h); imagecopyresampled($tci,$img,0,0,0,0,$w,$h,$w_orig,$h_orig); imagejpeg($tci,$thumb_path,80); imagedestroy($tci); }//end function create_thumb()
NOTE: you need to have images folder at same path where upload_script.php resides and a thumbs folder inside images folder.
your validation criteria and flow of project may be different, customize it according to your needs, I have just provided the basic method for how to upload image file using PHP and create its thumbnail on the fly.
you can also make multiple versions of thumbnails like 32x32 100x100 and 300x300 etc
The post PHP image upload with Thumbnail appeared first on Coding Sips.
]]>